Mostly rigging details...
... at this time, as they're commemorated at the time of the mast stepping.
Most of these will get some greater attention in further posts. For now here's what's been done (and what's been taking all the time towards completion of the boat).
In no particular order....
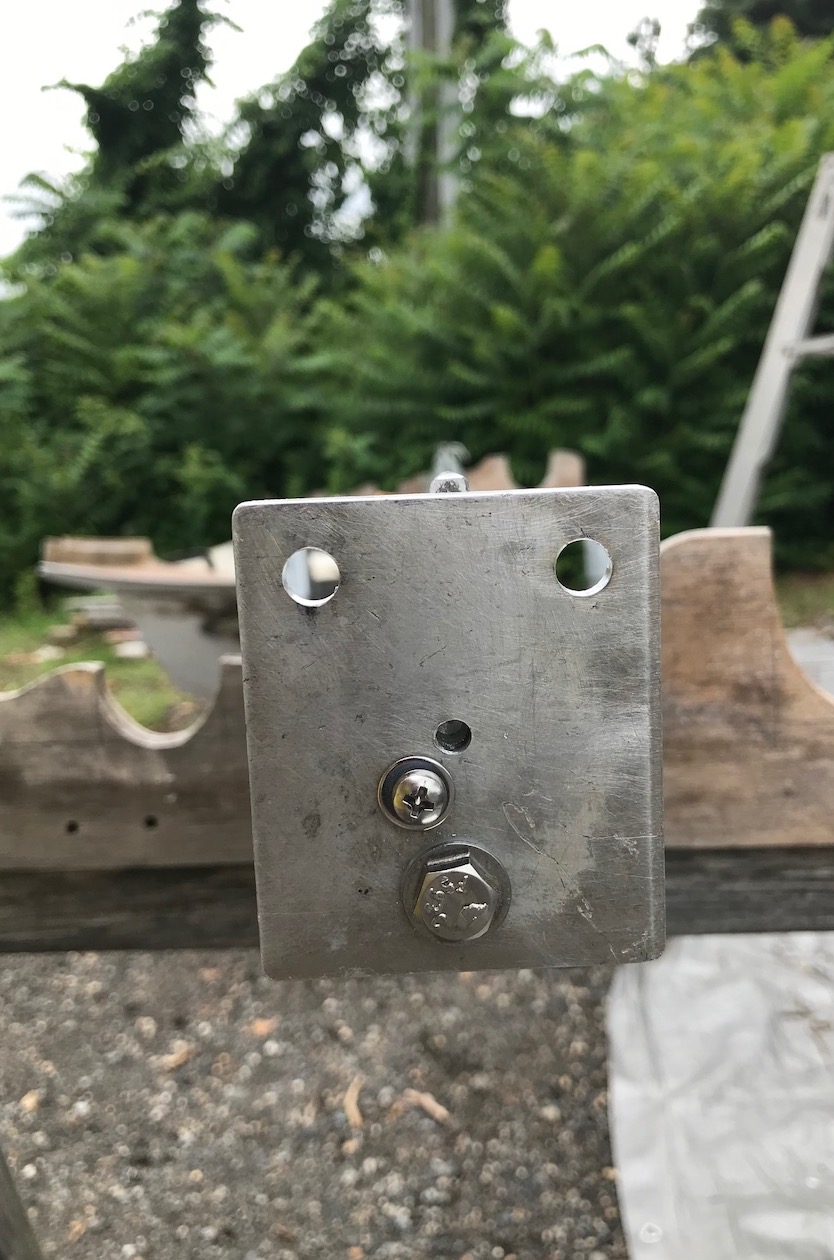
Fish plate

For split backstay - this is a pair of standard Schaefer parts but with an eye welded on each. The lower eye can be used for hanging anything above the cockpit and the upper one can be used for belaying the upper flag halyard.
Tang for inner forestay


The wire stay is attached via 4:1 tackle to eye on foredeck. The halyard (exit block below it) can be used as a pole lift.
That red-white-blue line is genuine c.1980s-spec 5/16" Sampson XLS Yacht Braid, for the pole lift/inner-jib halyard.
The red & white line is the spinnaker halyard; the block (like some fairleads farther down) contains the down-side of the halyard on its way to a turning block at the mast step.
Note cotter pins wrapped correctly with rigging/electrical tape. These should never be left uncovered and never be fitted with only cotter rings (especially 20 feet above deck). Blue tape on tang was for identifying which wire goes where; I decided to leave it on to see how long it'd last!
Lucky mast-step coin

Ttaped to mast step just prior to stepping the mast. I saved a 1974 Kennedy half-dollar for this (had it since it was new) but mislaid it in moving house; so I ordered a 1974 Eisenhower silver dollar on eBay. Paid $1.25.
The coin is taped up to insulate the silver from the aluminum mast step to prevent corrosion.
Shroud tangs

This is a Dwyer part replacing the original pair of (flimsy) single tangs.
Note clevis pin attaching spreaders, replacing (stupid idea of) large cotter pin. The cotter pins have yet to be 'finally' bent in this picture - such things are always checked 100% before stepping.
Spreaders are original 1" round tubing from 1974, painted with Brightside.
Spreader boots


These are from Plastimo - I had never used this type before; but they went on very well. The thing to remember about installing spreader boots is to not spare the rigging tape.
The yellow and blue Marlow 5- or 6-mm line is just awful for tying knots; and even properly-done whipping will work itself out against the toughness of the cordage coating. These have been replaced with proper sailing cordage from Yale and Sampson (using the 'ancient Chinese method' after the mast was up - ask me about this if you like).
Combination steaming light and foredeck downlight


This is a very nice fixture but it makes no provision for attaching the wiring to that in the spar, and especially not in any waterproof context. I discovered a short in one of these connections when all was tested prior to stepping the mast. When the connections were remedied, no room remained for the wiring connections. A fellow contractor in the yard suggested making these legs, which I cut out, drilled holes, and painted between 11 pm and midnight on the day before the crane was scheduled for stepping the mast. I attached these using 3/16" pop-rivets first thing in the morning - worked great.
Note the Racelite fairlead eye attached with pop rivets and nylon washers between the aluminum and the stainless steel. This is to prevent corrosion, especially in places that won't get scrutinized very often on account of being 20 feet up.
Note also that halyards on port are flecked red and halyards on starboard are flecked blue (since they had no green in stock). Principal halyards are all Yale UULS (discontinued; replaced in the market by 'ULS') which I prefer, even over (new-spec) Sampson XLS3. It is a very high-quality line with a very soft hand. And it has less susceptibility to kinking and hockling plus higher strength and lower stretch stats than the ubiquitous (for reasons that can be only down to marketing) NER Sta-Set X.
Top end of trysail track

Here is the track stop I made using StarBoard and two (mismatched) screws. I will often make stuff like this using StarBoard (about the only kind of StarBoard application I would rely on). The track is attached with pop-rivets through white electrical tape stuck to its back to insulate the stainless from the aluminum - a trick Capt Mike Lawrence and I used when we rerigged the Cherubini 48 schooner Amazing Grace/Light Reign together.
The stainless-steel slides are just sitting there for comparison in this pic. When the mast got stepped they all slid down to where they should be.
The shroud in the picture is the inner forestay, near its top end.
Upper end of mast

Pic is prior to paint and attachment of fittings and masthead plate.
Vent holes


Yes; they do resemble the 'portholes' of a 1950s Buick! These are 1-1/8" stainless-steel through-holes installed port-and-starboard in the topsides to provide fresh air to the holding tank (after pair), rode locker (next-forward pair), and forepeak above V-berth (forward pair). These work really well, especially when wind is off the bow or on the beam. The flow is small but steady - keeps off the musty smell.
The foam stuck in the toilet-tank vent was to keep bugs out till the hoses were connected to the tank. The rode-locker and forepeak vents have aluminum screen at the inner ends of the through-hulls to keep bugs from invading the interior (in my experience nylon screen will disintegrate or be eaten quite early).
Boom, as modified


Diana's customized (original) boom, prior to painting. The end was cut off at a stylish angle (1970s style, that is). It also provides access for maintaining or removing the internal outhaul tackle. The end fitting was fashioned from the original boom-end casting and furnished with a (custom-made) plate to carry the shackles for the topping lift and the reef line.
Upper end of mast

Showing spinnaker-halyard attachment ring on the (custom) masthead plate. Clevis pin just below is for headsail-halyard sheaves.
Jib and main have double halyards, to facilitate sail-setting options as well as for safety in redundancy. I don't think I'd last two day-sails owning a boat without double halyards. I've even had actual nightmares about losing a mainsail halyard right before rounding a key mark at the verge of a very ugly lee shore.
Foot end of mast

Showing what looks like a mass of wire and cordage. This is how to prepare a mast for stepping. Remember that, once up there, tangles and other mistakes threaten to have permanent effect - unless you don't mind hiring back the crane to send yourself up there or to bring the mast back down.
The strangely cool part is that I truly won't need these (aged) sawhorses again for another half a decade now.
Masthead tricolor light fixture


Custom-made by yours truly. All of the commercially-available tricolor lights have two major drawbacks for this application:
2. They all have the running light atop the anchor light. The anchor light is supposed to be an all-around light - that means not interrupted by two wires going past the bulb (as for the tricolor above it). Also, I consider it more vital that they see you when you're at anchor (and likely asleep or not on board) than that they see you when you're under way (and on watch, to steer the boat actively to avoid any near-misses). So the anchor light should always have been on top (and it's easier to run the wires that way; so the other makers have no excuse).
This little innovation here solves both those problems.
It was more difficult to assemble than I expected; but making the lenses and getting it to work were no trouble at all. The pin on top was supposed to be finished with a little brass angel finial (cute but also fitting); but no-one would ship one in time. Even without, it will still deter the birds from landing on it (and I left off the cap nut to help); and the Windex vane on the antenna (fitted to the masthead fitting) will scare them off as well.
Of course you know that the anchor light and running lights should never been activated at the same time (this is not a motorboat!); this was just to test the spar wiring. Needless to say these are both fitted with appropriate LEDs.
Deck reinforcement

Showing the aluminum angle used to reinforce the inner-forestay deck plate - the angle wanted a little tweaking.
As a quick observation - it's not everyone who gets to use a 1970s stainless-steel mizzen-shroud chainplate from a Cherubini 44 as an anvil!